Product photography significantly affects e-commerce sales. Products with great photos outsell products with mediocre photos by wide margins. But hiring professional photographers costs money that many businesses cannot easily justify, especially early on.
The good news is that professional-looking product photos are achievable at home with modest equipment and attention to technique. What matters is understanding the fundamentals of what makes great product photos and applying them consistently.
This piece covers how to take professional-quality product photos yourself, from equipment to technique to editing.
Why Great Photos Matter
The stakes are concrete.
Conversion Impact
Better photos convert more visitors to buyers. The correlation is direct and significant.
Perceived Value
Products photographed professionally seem more valuable. Products with amateur photos seem cheaper regardless of actual quality.
Return Reduction
Clear photos help customers know what they are buying. Fewer surprises upon delivery. Fewer returns.
SEO Benefits
Google Images drives significant traffic. Good photos rank better and drive traffic.
Marketing Efficiency
Great photos work in ads, social media, email, and everywhere else. Amateur photos undermine all these channels.
Brand Perception
Photos are a major component of brand perception. Great photos build brand credibility.
Equipment You Need
Not as much as you might think.
Camera
Modern smartphones take excellent photos. iPhone 12 or later or equivalent Android phones work well for most products.
For higher-end needs, entry-level DSLR or mirrorless cameras. Canon Rebel, Sony a6000, or similar. $500-$800.
Tripod
Absolutely essential. Even the best cameras need stable positioning.
Any decent tripod works. $30-$100 for a good one.
Lighting
Natural window light works for many situations. Free.
Continuous lighting kits: $100-$300. Softboxes with LED lights.
Studio strobes: $500-$1,500. More powerful, more consistent.
Backgrounds
White seamless paper or vinyl backdrops. $20-$100 depending on size.
Colored options for specific looks.
Reflectors
Bounce light onto the shadow side. White foam board works. Or dedicated reflectors.
Cleaning Supplies
Products need to look clean in photos. Microfiber cloths, dust blowers, air canisters.
Editing Software
Adobe Lightroom is standard. $10 per month.
Free alternatives: GIMP, Darktable.
Setting Up Your Space
The workspace matters.
Location
Any room with good window light works for natural light setup. North-facing windows provide consistent diffused light.
Dedicated space is nice but not required.
Table or Surface
Sturdy surface for products. Height that works for shooting.
Backdrop Setup
Sweep paper from wall to table creates seamless white background. Simple and effective.
Camera Position
Tripod at appropriate height for product type. Adjust for different products.
Lighting Position
Depends on light source. For window light, product near window. For studio lights, positioned to illuminate product.
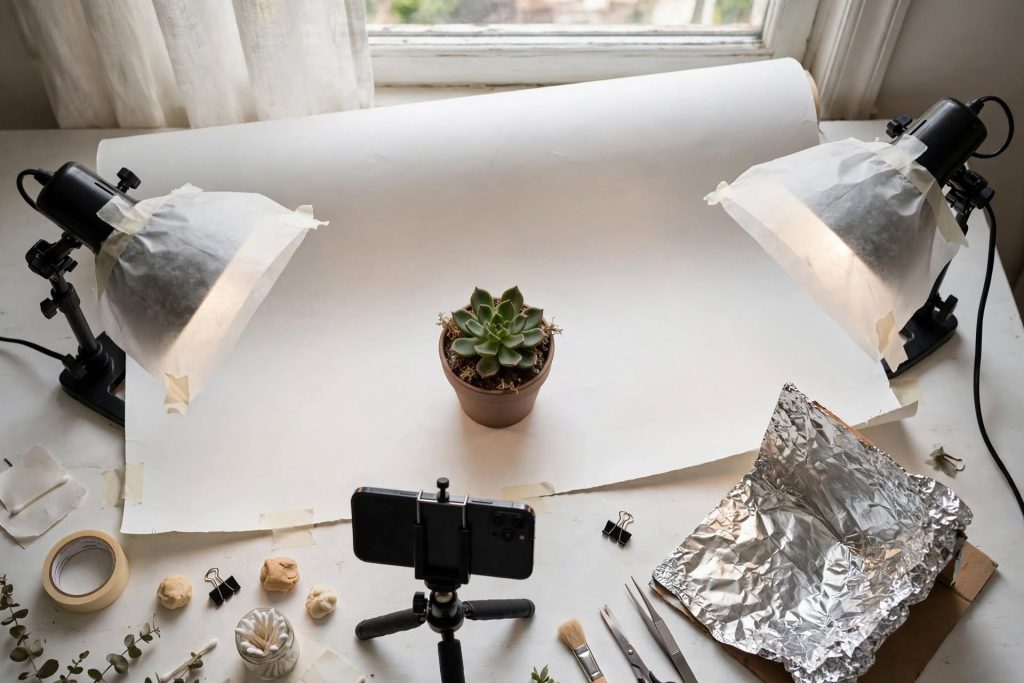
Basic Product Photography Setup
The starting point.
Product on Sweep Background
Product placed on white seamless background.
Window Light or Softbox
Diffused light from side illuminates product.
Reflector Opposite Light
Bounces light back into shadows. Softens contrast.
Camera on Tripod
Positioned to capture desired angle. Usually product level or slightly above.
Multiple Angles
Front, back, side, top, detail shots. Cover the product completely.
Consistent Position
For catalog work, consistent product positioning across shots.
Lighting Techniques
Where photography lives or dies.
Natural Window Light
Best free lighting source. Diffused north light is ideal.
Position product near window. Position self so light falls on product from side or front.
Diffusion
Direct light creates harsh shadows. Diffusion softens light.
White sheer curtain over window diffuses natural light. Softboxes diffuse studio lights.
Reflection
Fill shadow side with reflected light. White surface bounces light back.
The Three-Point Setup
Main light from one side. Fill light or reflector on other side. Backlight from behind.
Not always needed but produces professional results.
Avoiding Direct Sunlight
Direct sunlight creates harsh shadows. Diffused window light on cloudy days is often ideal.
Consistent Lighting
For multiple product shots, maintain consistent lighting. Otherwise, products look mismatched.
Camera Settings
Understanding the basics.
Aperture
Controls depth of field. For product photography, f/8 to f/11 keeps whole product in focus.
ISO
Controls sensor sensitivity. Lower ISO produces cleaner images. Use lowest ISO your lighting allows.
Shutter Speed
With tripod, slow shutter speed is fine. Long exposures let more light in.
White Balance
Match your light source. Auto works often. Manual white balance for consistency.
RAW vs JPEG
Shoot RAW for editing flexibility. JPEG is fine for simpler workflows.
Focus
Sharp focus is essential. Autofocus on the product. Manual focus for precision.
Composition
Beyond just capturing the product.
Rule of Thirds
Divide frame into thirds. Place product elements on thirds lines. More interesting than centered.
Negative Space
Empty space around product. Draws attention to product. Not everything needs to fill the frame.
Product Positioning
How the product is angled affects how it looks. Try different angles.
Multiple Views
Shoot from multiple angles. Front, side, back, top, detail shots.
Detail Shots
Close-ups of important details. Textures, features, craftsmanship.
Lifestyle Context
Products in use or in appropriate settings. Different from clean product shots but complementary.
Different Product Types
Different techniques.
Jewelry
Small details matter. Macro capability important. Diffused lighting to avoid harsh reflections.
Consider lightbox or tent for controlled light.
Clothing
On mannequin, hanging, or flat lay. Ghost mannequin technique makes clothes look worn without visible mannequin.
Consistent styling matters.
Food
Fresh appearance essential. Quick shooting before food changes. Natural lighting often best.
Props and styling significantly affect food photography.
Furniture
Larger scale. Room settings or context help.
Whole product plus detail shots.
Reflective Products
Metal, glass, glossy surfaces. Tricky because reflections show camera and photographer.
Tent lighting helps. Polarizing filters reduce reflections.
Small Products
Macro capability. Attention to detail. Lightbox often useful.
Large Products
Larger space needed. Sometimes on-location shooting.
Backgrounds
Beyond just white.
White Background
Standard for catalog. Clean. Product-focused.
Colored Backgrounds
Match brand colors. Creative options.
Textured Backgrounds
Wood, concrete, fabric. Add character. Match product context.
Contextual Backgrounds
Products in relevant settings. Kitchen items in kitchen. Furniture in room.
Removing Backgrounds
Photoshop or similar tools remove backgrounds. Time-consuming but produces clean results.
Some AI tools do this automatically.
Editing Photos
Post-production matters.
Basic Adjustments
Exposure. Contrast. Highlights. Shadows. Whites. Blacks. Get the overall look right.
Color Correction
White balance adjustments. Ensure whites look white. Colors accurate.
Cropping
Tight cropping focuses attention. Consistent crops across product catalog.
Retouching
Remove dust, scratches, imperfections. Not to change product but to show it at its best.
Sharpening
Add sharpening for web display. Not too much or it looks unnatural.
Consistency
All product photos should feel like they belong together. Consistent editing across catalog.
Batch Processing
For many photos, batch processing saves time. Apply similar edits across many photos.
File Preparation
For web use.
Resolution
High enough for zoom. Not too large for slow loading.
Around 2000-3000 pixels wide works for most e-commerce.
File Format
JPEG for photos. PNG for products on transparent backgrounds if needed.
File Size
Optimize for web. Compressed but still high quality. Around 200-500KB per image typically.
Naming Conventions
Descriptive filenames. Include product name and shot number. Helps SEO.
Multiple Sizes
Store platforms often generate multiple sizes automatically. Provide high-resolution originals.
Common Photography Mistakes
Where DIY photographers stumble.
Bad Lighting
Insufficient light. Harsh shadows. Wrong color temperature. Lighting problems dominate DIY issues.
Camera Shake
Handheld shots at slow shutter speeds. Blurry results. Always use tripod.
Wrong Focus
Focus on background instead of product. Or focus in wrong part of product. Sharpness matters.
Poor Composition
Product centered without thought. Awkward angles. Missing important angles.
Inconsistent Style
Different photos in different styles. Product catalog looks chaotic.
Dirty Products
Visible dust, fingerprints, imperfections. Clean products before photographing.
Wrinkled Backgrounds
Wrinkles in backdrop showing in photos. Iron backdrops or use surfaces that stay flat.
Missing Detail Shots
Only whole-product shots. Customers cannot see important details.
No Post-Processing
Photos straight from camera. Not optimized for web. Some editing significantly improves results.
When to Hire Professionals
Beyond DIY.
Complex Products
Products with difficult lighting requirements or specific styling needs.
Large Catalogs
Time investment for many products makes professional efficiency valuable.
Marketing Campaigns
Hero images for major campaigns benefit from professional quality.
Lifestyle Shots
Contextual photos with models often benefit from professional expertise.
Video Content
Video production adds complexity beyond still photography.
When ROI Justifies It
Successful stores with revenue can justify professional photography investment.
Learning Photography
Improving over time.
Online Tutorials
YouTube has extensive photography tutorials. Free learning.
Books
Photography books cover fundamentals thoroughly.
Practice
Skill develops with use. Shoot regularly. Learn from results.
Study Great Product Photography
Look at what works on successful e-commerce sites. Notice what makes photos effective.
Analyze Your Own Work
Look at your photos critically. What could be better?
Community
Photography communities online for feedback and learning.
Building Consistent Product Photography
Systems matter.
Documented Setup
Document your setup so you can recreate it consistently. Camera settings, lighting positions, product positioning.
Style Guide
Establish what your product photography looks like. Backgrounds, angles, editing style. Apply consistently.
Batch Shooting
Photograph products in batches. More efficient than individual sessions.
Templates
Editing templates that apply consistent look. Save time and ensure consistency.
Quality Standards
What makes a product photo acceptable for your store. Consistent standards.
Continuous Improvement
Better lighting equipment. Better technique. Better editing skills. Improvement continues.
Wrapping Up the DIY Photography Approach
Great product photography is achievable at home with modest equipment and attention to fundamentals. Businesses can produce professional-quality photos that support their e-commerce operations.
For businesses just starting, natural light and a smartphone can produce results that beat many websites. Focus on the fundamentals before investing in expensive equipment.
For businesses with some revenue, modest investment in equipment produces significant improvements. Tripod, lighting kit, backdrops. Under $500 for meaningful upgrade.
For larger operations, better equipment produces better results. But even at higher levels, technique matters more than equipment.
The fundamentals are lighting, composition, and consistency. Master these and photos look professional regardless of equipment level.
For businesses hiring photographers, understanding what makes good product photos helps you evaluate their work and communicate what you want.
For businesses doing DIY photography, systematic approach produces consistent results. Not just occasional great shots but reliable output.
Product photography deserves investment because it affects every sale. Every product page. Every marketing campaign. Every social media post.
The investment in learning photography pays back through every product photo you take from that point forward. Skills compound over time.
For businesses committed to DIY approach, treat it seriously. Learn techniques. Invest in reasonable equipment. Develop systems.
For businesses with limited time, consider hybrid approach. Professional photos for hero images. DIY for supplementary shots.
The tools available today make good product photography accessible to almost any business willing to invest in learning and modest equipment.
Bad product photos undermine even great products. The customer cannot experience the product physically. Photos represent the product. Photos also represent your business.
Great product photos elevate perception of the product and business. This affects conversion rates, prices customers accept, and brand perception.
For most businesses, better product photography is one of the higher-ROI improvements available. Modest investment. Compound returns across all products and marketing.
Take product photography seriously. Learn what makes photos work. Invest in reasonable equipment. Develop systems. Practice regularly. Improve continuously.
The result should be product photos that actually serve your business. Not just documentation of products but marketing assets that drive sales.
For businesses with amateur photos currently, systematic improvement can produce dramatic results. Not overnight but through consistent effort.
For businesses with decent photos, continued improvement produces incremental gains that add up.
For businesses with professional photos, ensure ongoing photography needs are met. As catalogs grow and change, photography needs continue.
Product photography is not glamorous work but produces meaningful results. Every customer who considers your products sees your photos before they buy or leave. Making that visual experience compelling is one of the most impactful things you can do for your e-commerce business. Take the time to develop your photography, and every product benefits from photos that actually serve them well.